Printing guide
In this section, we’ll help you create your production files. If you encounter any difficulties, please do not hesitate to contact us with any questions you may have.

Print format
We print exclusively in A3 format: 297 x 420 mm. A 6 mm non-printable margin is required, which means that the printable area is 287 x 410 mm. However, if you have large solids close to the edge, we recommend increasing the margin to 0.8 to 1 cm to ensure even inking.
Printing with bleed
When printing with bleed, it is necessary to send us the file with a minimum of 2 mm bleed. We’ll take care of adapting it to A3 format.
There may be an offset of 2 to 3 mm when printing and cutting. Be sure to place your text or any illustrated elements 3 mm inside to avoid any risk of cutting.
This process is slightly more expensive than border printing, as it requires more time and materials.

Cutting lines


Printing with border
For prints with a white border, a border of at least 6 mm is required. For example, for an A4 format, we can place two A4 plates in an A3. This printing process is more economical.
However, if your design is well inked and requires several passes of color, we recommend printing with bleed to avoid marks on your prints.

Cutting lines
Text
Text included in your files must be vectorized. We recommend that you use InDesign or Illustrator to process your text, as Photoshop can lead to pixelation.
To ensure good legibility, avoid reducing the size of your text below 6 pt.
If your text is white on a colored background, increase the size, as microperforation around it can reduce and visually alter your text.

Microperforation
around text
Color printing
in text

Grayscale files
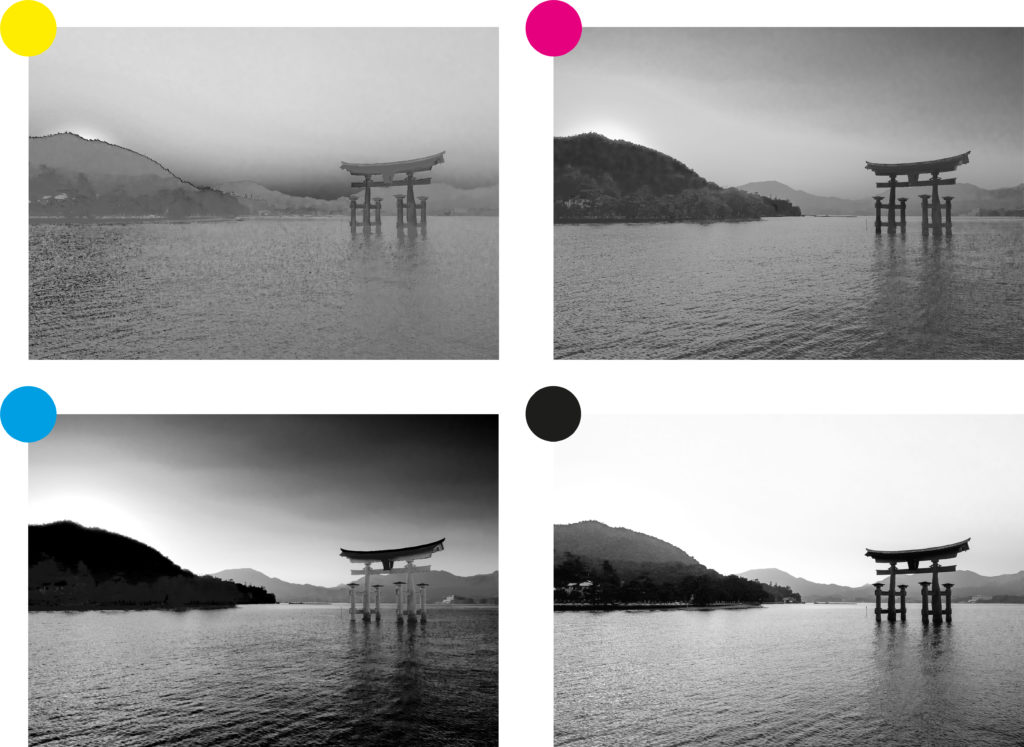
Images should be in grayscale, not RGB or CMYK. The closer the file is to black (100%), the more intense the printed color. Conversely, the lighter the gray tones (10%), the lighter the printed color.
These gray values are automatically transformed into halftones, so you don’t need to create the halftones yourself.
Illustrated file
Separate each layer by grayscale color. It’s also important to name your files according to page and color.
Example : Nom_Recto_Medium-blue.pdf
Please also send us a preview of the color version to ensure a quality print for your run.
Example: Nom_Apercu-couleur.pdf


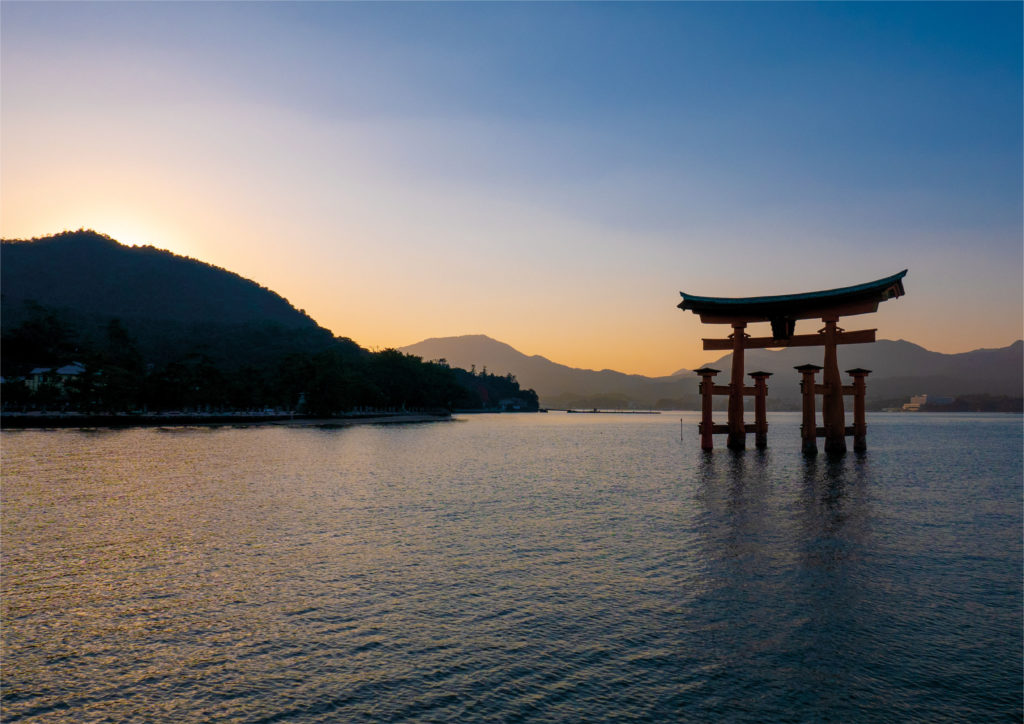
Photo file
Risography, like screen printing, enables us to produce photographic prints in CMYK (cyan, magenta, yellow, black), allowing us to replace the CMYK layers with colors selected from our ink catalog.
Color separation with Photoshop
- Switch your image to CMYK
- Go to the Layers window
- Click on the drop-down menu at the top right of your Layers tab. Select “Separate layers”.
- Each layer will be opened in a separate file, which you save in the final formats indicated above.

Data submission
All files must be sent via the quotation section of our website. Accepted formats are: PDF, PSD, Illustrator, JPEG and ZIP.
To ensure good print quality, we recommend that you send your files with a resolution between 300 and 600 dpi. A color preview is recommended, as well as each color layer in grayscale.
Please note that we do not accept files created by PostScript.
Inks
The colors you see on your screen may differ from the final printed result. What’s interesting about risograph printing is that it allows for color layering, similar to watercolor. For example, if you mix yellow and aqua blue, you’ll get a shade of green.
We offer two categories of ink: special inks and standard inks, with a slight difference in cost. For more details, please refer to our pricing chart.

Ours papers
Our risograph printer can handle paper up to 300 g/m².
Due to the nature of the ink, which takes longer to dry than standard printing, we work exclusively with absorbent, uncoated paper. This type of paper helps reduce the risk of smudging, as its porous surface allows the ink to be absorbed properly. We only offer high-quality and standard papers that are environmentally friendly.
If you have a specific paper in mind, you can order it through our catalogs. We’d be happy to welcome you to our workshop to discuss your needs.
Lessebo 1.3 Rough White 80g / 120g /200g/ 240g
This white paper is perfect for all types of printing, whether for text or illustrations.
Lessebo 1.3 Rough Natural 80g / 120g / 240g
This white paper is perfect for all types of printing, whether for text or illustrations.
Munken Polar Rough 90g / 150g / 300g
This white paper is the most versatile. It is suitable for both detailed projects with gradients and large areas of solid color.
Munken Pure Rough 90g / 150g / 300g
This cream paper is the most versatile. It is suitable for both detailed projects with gradients and large areas of solid color.
Risk and traces
There are various risks of marks appearing during the printing process. Here are some examples you can avoid. In most cases, try not to ink your prints at 100% when using solid areas or multiple passes.

Roller Marks
This occurs when the roller passes multiple times over the same area.

Smudge Marks on the Edges
This happens when the areas at the edges are overloaded with ink.

Front/Back Marks
This occurs when the other side of the print is overloaded with ink.
Process
We only accept quote requests sent via our Quotes page. All our quote offers are valid for 10 days. If we do not receive a response or file submission within this time frame, your order will be automatically canceled. You will then need to place a new order via our online form.
PPD (press proof document)
We send you a file which will be as close as possible to the final result before each print. You will be asked for validation by email before printing begins.
Option Support
If you do not know how to create the production file, we will take care of doing it for you. All you have to do is deliver the color files to us, and we will adapt everything for risography printing. This option is extra.
Manufacturing time
The manufacturing time of your project depends on several factors, including the preparation of your files.
To guarantee a result that meets your expectations, several round trips may be necessary before printing. We are also subject to pending orders. By following our instructions when sending your files, you will ensure faster receipt of your product.
Delivery
Delivery time is generally between 2 to 3 days for Switzerland and 4 to 5 days for European countries. During the holiday period, additional delays may be caused by postal services.
Our bindings
We offer binding services to best finalize your fanzine, diary, brochure type projects. The quantity of pages may vary depending on the choice of paper.

Hand sewing
Maximum 80 pages

Binding Staples
Maximum 40 pages

Machine sewing
Maximum 44 pages

Metal binding
Maximum 80 pages

Plastic rings
Maximum 60 pages

Glued square back
Coming soon
Metal or plastic binding

Stapled, machine or hand stitched binding

Fanzine
When designing your fanzine, there are several important points to take into account. Here are the files we need:
Color Preview
Provide a color preview of your zine, with the pages in their final order.
For metal or plastic blinding
Submit your grayscale file, page by page, in page order.
For stapled, machine-sewn or hand-stitched binding
Please send us a PDF in sheets with the visuals already imposed. For example, for a 32-page booklet, the imposition should have page 1 facing page 32, page 2 facing page 31, and so on.
Caution : Do not use a PostScript program to carry out the imposition, as our machines do not read these files, which can cause errors when printing. We cannot be held responsible for these problems. We recommend that you carry out the imposition manually.
Please do not hesitate to contact us if you have any questions or need assistance.
Folding area